Showing posts with label DIY. Show all posts

Wednesday, January 4, 2017

DIY Tea Box


It has been quite a while since I've posted a project. Almost a year. It is time...

It's winter again. The hardwood floors in my old house and lack of insulation in the walls make for a miserable few months in Minnesota. There is a solution: hot beverages.

Tea has become a staple in this house. So much tea. It began taking over an entire shelf in one of my cupboards. Containment and consolidation was needed, thus the Tea Box project came to life.

My cupboard shelf went from cluttered to satisfyingly empty in one evening.


Materials Needed:

  • Wooden box of your choice. 
  • If the box doesn't have dividers, you will need:
    •  1/16" thick basswood
    • Scissors
    • Wood glue
    • Ruler
  • Paint brush
  • Brown acrylic paint or a wood stain
  • White gel pen and pencil
  • White transfer paper (optional)


When I went to my local craft store, I brought a tea bag with so I could make sure the box I chose would work. I tried to find a box that already had dividers in it, but the compartments were too small. Instead, I picked up a 24"x2"x1/16" sheet of light basswood so I could cut my own dividers.


Using a tea bag for reference, I measured how many tea slots would fit in the box and marked each side with a pencil. Then, I cut pieces of basswood to fit snugly. The basswood I found was thin enough to be cut with plain scissors. Using wood glue, I lined the bottom and sides of each divider, placed them where I penciled my measurement marks in the box,  and waited about until the glue dried before moving onto the next step (maybe 30 minutes to an hour).


To "stain" the box, I used brown and black acrylic paint I already had at home and watered it down. I wanted the wood grain to show through, so I used a very thin mixture of paint and applied a couple of coats. The first coat I applied was too light for my taste, so I added a little bit of black paint to the mixture for the second and third coats.


Once finished with the stain, allow the box to dry completely. Once dry, you can apply your lettering to the top of the box. I didn't take pictures of this process, but it's fairly straightforward. I sketched the lettering I wanted on paper and then used white transfer paper to neatly transfer the lettering onto the box. You can definitely freehand on the box--but I don't trust myself to get things right the first time. Once I had the outline traced, I used a white gel pen to fill in the design.


And voila! The box is done! It was incredibly satisfying to organize all of my tea bags into my new box. 


Thanks for checking out my project! If you enjoyed this, please explore the rest of my blog. I've got lots of random crafty things to peruse.

You can also pop over to www.MessyEverAfter.com to see what else I'm working on.


Tuesday, June 16, 2015

Lib Balm Labels: From Scrapbook Paper and Packing Tape


I just finished the tutorial for making Tinted Lemon Lip Balm, and as promised, here is the tutorial on how to make labels for the tubes. Super cheap and adorable labels, I might add. I know there are other options online, where you can buy fancy labels and what not, but it's just not as satisfying and industrious as these little beasties.

Okay, to start, gather some supplies. You will need:

  • Scrapbook paper of your choosing. 
  • Clear packing tape. 
  • Scissors and/or guillotine cutter. 
  • Return address labels, or plain printer paper. 
Take your scrapbook paper and cut pieces measuring 2"x 1 3/4". If you plan on using labels, you can either print or hand write the ingredients. I chose the printing method, because I didn't want to write the same thing 11 times. You don't even need the sticky labels. You can print the ingredients onto a piece of paper and cut them down to size. 


I placed the labels in the middle of the scrapbook paper pieces.


Take the packing tape and roll out a strip onto the table, sticky side up. Turn the scrapbook paper pieces over and place them on the tape. Keep at least a quarter of an inch of tape between each piece.


Cut the tape, making sure to leave excess on each side of paper. The tape should fit perfectly on the lip balm tubes. Press the edges of the tape onto the tubes, and voila!


Easy lip balm tube labels! Give them a try and let me know what you think.


Homemade Tinted Lemon Lip Balm


I am obsessed with lip balm. When I was in high school, I wore holes through my back pockets, because I always had a stick with me. I just can't handle dry lips, apparently. So, it's surprising that it took me so long to try and make my own. There are countless recipes online for lip balm. It's kind of crazy. Why would I want to add another recipe to the mix? I highly doubt there is anything original about my lip balm, but I suppose originality isn't really my concern. I just need an excuse to use my new DSLR camera and be on my laptop for hours at a time. The life of an introvert. 

To the balm! I used to formulate my recipes with exact measurements, but now I approach it with the same technique I use for cooking; eyeball it and hope for the best. Sometimes it works, sometimes it doesn't. My homemade products deal mostly in ratios. Lip balm has a very simple composition. One part wax, one part butter, one part oil. Here's what I needed to make my tinted lemon lip balm:

Ingredients:
  • One part beeswax. I got my hands on some wax from a local beekeeper. It's much better than the cosmetic grade beeswax, because it smells like honey. But, if you want a cleaner, less fragrant wax, go for the processed stuff. Both work. 
  • One part shea butter. I used the refined version. 
  • One part oil. Or actually 1/2 part coconut oil, and 1/2 part jojoba oil. Coconut oil is everywhere now, but jojoba oil is a bit more expensive and can be substituted for any other liquid oil. Sunflower oil is a great one for lip balm. 
  • Essential oils of your choosing. I used lemon. Ten drops did the trick for this small batch. 
  • Mica powder to tint. I used to use Coastal Scents to buy samples of mica powder, like the cellini red I used for this lip balm, but it seems they stopped selling the powders. So, what the crap?! I just ordered from them not that long ago! But I found this site, with similar products. I think it will work. When buying mica pigments and powders, just make sure it says it is safe to apply onto your lips. You don't need much. A lot of references recommend that you use only 5 to 10% powder in your recipes for lips. 
Tools: 
  • I use a makeshift double boiler. Fill a pan with a little water and set a metal or glass bowl over the top. I use medium heat. 
  • A spoon! And possibly a straw! Or, a Popsicle stick if you have one handy. 
  • Measuring cups if you like (for example, my recipe was a smidgen less that 1/4c for each part)
  • A stove or a hot plate. 
  • Wax paper to keep your work surface clean (Optional, of course. Depends on how messy you are feeling.) 
  • Lip balm tubes. 


I tossed all of my ingredients (except the essential oil and mica powder) into my metal bowl. I had to cut up my wax chunk so that it melted faster, just fyi.


And we're melting. And we're stirring. And we're melted!


I always remove my mixture from heat to add my last two ingredients. Using a straw with a section cut out (it looks like a little pointy scooper), I dug around in my mica powder pouch until a had a little mound on the tip. You could use the Popsicle stick here if you had one. I should buy a pack. I've been meaning to do that. But I digress. It's maybe an eighth of a teaspoon total...or a sixth. It's a small amount, anyway.


I try to work quickly so that my mixture doesn't start to solidify. I stirred in the mica powder, and then added 10 drops of lemon essential oil. I stirred some more and was ready to pour. Ha! Rhyming.

I had this brilliant idea to pour my mixture into a cup with a pour spout so that I could have an easier time filling the lip balm tubes, but it failed.


Look at those splatters and drips. Towards the end, I just dumped the mixture back into the metal bowl and used that to pour. Weird that it worked better. If your mixture starts to set in the bowl, just pop it back into your pan of hot water. It will usually melt quickly.


There are little tools to help with the messes made from filling lip balm tubes. Like this nifty thing. If I start making a lot of lip balm at once, I may invest in this. If you are really picky, you can take a flat scraper thing and smooth out the tops of your balm, but it doesn't bother me to have the dimples.


And there you have it. Recipe number 1,452,901 on the internet for making lip balm. How exciting!? Well, it's a project that pays for itself rather quickly, so it actually is pretty cool. It took me 15 minutes to make 11 tubes of lip balm, that could be sold for $3 a pop and labeled 'artisanal'. Or, find some friends that want to experiment with homemade beauty products. Spend $40 on supplies, and make a girls (or guys) night of it. Everyone walks away with some useful products. I'm just throwing some ideas out there...

Anywho, if you liked this project, check out these other homemade beauty product recipes:

Natural Face Cream
Shimmer Body Butter
Styling Hair Paste

If you have any questions, please comment below. Also, I would love to hear about your experiences with making lip balm, if you have any. Oh, and I will be posting a quick tutorial about making lip balm labels shortly.

As always, thanks for checking out my post!


Sunday, November 16, 2014

Shrink Plastic and Wire Earrings Tutorial


If you are familiar with my jewelry, you may have noticed by now that I rarely use beads, if ever. I love to incorporate color into my designs, but I try to do it in a new way. I try to use different materials like nail polish, alcohol ink, liquid polymer clay, and now illustration markers. It's cool to see how many unconventional materials I can use to make jewelry. 

For this pair of earrings, I used shrink plastic film, colored with Blick brand illustration markers. These are comparable to Prismacolor markers, but are a little bit cheaper. Illustration markers are primarily alcohol based. You can use Copic as well, but my goodness those are spendy things! Or bottles of Adirondack alcohol ink and a brush would work. Oh and sharpies! I can't forget about those. 

Materials Needed:
  • clear shrink film plastic
  • scissors and/or paper cutters (like guillotine cutters)
  • hole punch (standard three ring binder paper punch size)
  • alcohol based markers or ink (Copic, Prismacolor, Blick, Sharpie, Adirondack, etc.)
  • 18 gauge wire
  • 8 jump rings (you can make them yourself with the wire and tools)
  • wire cutter
  • round nose pliers
  • flat nose pliers
  • earring posts with 4mm pads (Or french hook ear wires if you want to eliminate a step)
  • super glue/super glue gel/E6000 glue (whichever you prefer)
To begin, cut your desired shapes out of the shrink plastic. I wanted to use long rectangular shapes. When you bake the shrink plastic, it reduces to about 20% of the original size. I did some guess work when cutting my shapes. I cut strips of the plastic, wide enough to fit a standard hole punch with a little extra plastic on the sides. I would say my longest shapes were three inches or less in length and 3/4 inch or less in width. 


I punched holes in each rectangle and then cut irregular angles from the tops of the shapes with my scissors so the shapes wouldn't be so boxy. And sorry about the flash reflection in the pictures. The lighting in my work room was not bright enough to turn off the flash.

Next, I took my illustration markers and just started doodling.


I used tinfoil to line a baking sheet and placed all of my doodled plastics on it. The directions said to bake at 250 degrees for 3 to 5 minutes. It's kind of fun to stare into the oven while the plastic shrinks. There's nothing wrong with a grown adult sitting cross-legged on the floor, staring into the oven. Silly? Yes. Wrong? No.

As you can kind of see from the last picture. The designs shrunk nicely, and the marker became more saturated and intense. The green pieces are my favorite.

Next, I made the swirly wire designs for the studs. Using 18 gauge wire and your round nose pliers, twist the wire tightly until it is wider than the post pad. I usually twist with the flat nose pliers for a better grip. Snip your wire with your wire cutter and then create a loop at the end with your round nose pliers.


Repeat this for the second piece.

If you want, you can pound the design with a chasing hammer and bench block for a flatter look, but that's totally optional.

Take your glue of choice and place a little drop on your post pad. Stick the posts to one side of your spiral designs and allow to dry according to your glue's directions. The super glue gel sets up in less than 15 minutes.


Using the cap of my super glue and more 18 gauge wire, I formed a circle for the next part of the earrings. 


Once you form the circle, twist one end with your round nose pliers to make a loop, then cut your wire from the spool. Twist the other end of the wire to make another loop like the sixth picture. I curled it into the circle. Repeat this for the second piece. 

Now, you will need your eight jump rings. You can make them yourself by following the pictures below, but you can also buy them if you want. 


Now you are ready to assemble your pieces. Using your flat nose and round nose pliers, open and attach the jump rings to your plastic pieces and connect them to the circle design. Then use the last jump ring to connect your stud spiral to the top loop of your circle design.  


There you have it. A nice pair of dangle earrings. The plastic pieces sound kind of cool when they click together as you wear them. If you have questions or comments about this tutorial, please let me know! I would love to hear from you. 


Friday, November 14, 2014

Abstract Art Paper Earrings Tutorial


If you have been following my blog, you would have seen my last tutorial for an abstract art pendant. As promised, I will show you how to make the matching earrings for the pendant. Now, the picture shows a purple pair of earrings instead of blue, but the technique is the same. I just wanted to switch up the colors, because I like variety. What do they say? Something about that being the spice of life...

Anywho, I have really fallen in love with this technique to make paper earrings. Pretty much, if you cover any paper in enough glue/mod podge/sealer of your preference, you can have a durable material for jewelry. I made a pair of earrings using scrapbook paper and it worked out perfectly, so was inspired to try using art as well. 

Materials Needed:
  • Oval/circle punch of your choosing
  • dimensional glaze and/or Tacky glue/Mod Podge (I like to use a gloss finish)
  • small brush
  • 1/8 inch hole punch
  • four jump rings or 18 gauge wire, wire cutter, and round nose pliers to make your own (I will include tutorial for jump rings below)
  • Earring hooks (I use titanium ear hooks since I am allergic to nickle based metals)
  • art (follow this tutorial to make your own abstract art)
  • cereal box or cardstock (I recommend anything higher that 100lb weight)
  • flat nose pliers to assemble pieces

I used this purple pendant for color inspiration. I have made quite a few abstract art sheets during the last year, so I have plenty of colors to choose from.

As you can tell, I like to throw in some shimmer paint to make things sparkle. To make this purple art sheet, I used a purple acrylic paint, mixed with a silver paint. I usually get most of my art supplies from Dick Blick, but you can get quality acrylic paints from craft stores as well. You might pay a little more, though, so always use a coupon!

To begin, take your circle/oval punch and punch two pieces of cereal box/cardstock, and four pieces of your art paper. You will sandwich the cereal box piece between two pieces of art so that your earrings have art on each side. Using a small brush and tacky glue or Mod Podge, spread a little glue on one side of the cereal box and press your art onto it.


Repeat this step with both sides of each earring. I let the four sides dry for about 15 minutes before moving on to the next step.

From the second picture you can see that the earring is pretty thick. This will prevent the paper from warping when it dries. I made a test pair of scrapbook paper earrings without a thick center and it warped really bad and just looked ugly. Nobody wants that.


Once your glue dries enough, then take your 1/8 inch hole punch and put a hole in each earring piece. Next, using your dimensional glaze, spread a thin layer onto one side of your earrings. You could also use Mod Podge. It's up to you whether you want a glossy or matte finish, but I prefer glossy at this moment.


Let the glaze/glue dry completely before covering the back sides with more glaze/glue. I wait a couple of hours and work on other projects between glaze applications. Yay, multitasking!

Once your pieces are completely dry, you can begin assembling your earrings. If you want to make your own jump rings. Follow the pictures below.


Using your flat nose pliers. or whatever tools you prefer, open the jump rings and begin connecting your pieces. I use two jump rings per earring. 


And now you have a pair of abstract art paper earrings! If you have any questions or comments please let me know. I would love to hear what you think of this tutorial. Have you ever tried making paper earrings? 


I also made a pair from more scrapbook paper as you can see from the second pair of earrings pictured. 


If you enjoyed this tutorial, you might also be interest in the following posts:


Wednesday, November 12, 2014

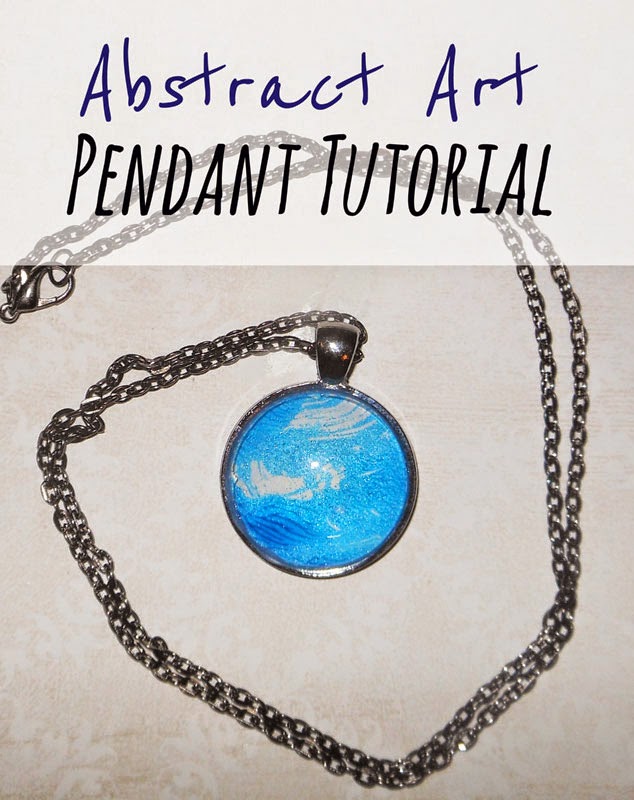
Abstract Art Pendant Tutorial


Last night, I decided to make an icy blue pendant to capture the cold Minnesota weather. As I made this, I was wrapped in a blanket cocoon, because I am quite certain my craft room barely reaches 60 degrees in the winter (technically it's still fall, but nature doesn't seem to care about that right now). Stupid old houses and their draftiness.

Materials Needed:

To start, squeeze a little dimensional glaze onto the glass piece. Then place the glass onto your art. Gently push down and make sure there are no bubbles under the glass. You can use any clear glue you want in place of the dimensional glaze, if you are feeling cheap. I used Tacky glue when I first experimented with this project, and it works decently. The main difference is that dimensional glaze is less likely to create air bubbles under the glass. So if you are picky, use a dimensional glaze. 

Let the glaze dry for a while. I think I waited an hour. Then trim off the excess paper. Next you will need to seal the back of the paper with more glaze. Use the tip of the bottle to spread a small amount of glaze onto the paper. 


Let this dry for another hour or so. Next, you will put more glaze on the back of the paper. Turn the glass over, and place it into your pendant tray. Allow to dry, again. There's a lot of dry time with this project. Maybe find other things to do in the spare time. Like make a matching pair of earrings! 


I used a 24 inch gunmetal chain for this pendant. 


And would you look at that! A matching set of paper earrings. Stay tuned for that tutorial. (Update: Here it is! Abstract Art Paper Earrings Tutorial)


If you have any questions or comments, please leave them below. I would love to hear from you and see what projects you are up to! If you enjoyed working with the glass pieces, you can take a look at some of my other tutorials like the ones listed below. 

Abstract Art Pendant Earrings Tutorial (You could easily make matching earrings with this tutorial!)

Stained Glass Wire Earrings Tutorial


It snowed. I know I make the choice of living in Minnesota, but seriously. A foot of snow in November is not cool. I have not left the house for a couple of days, so I figured I better make use of my time and start making more tutorials.

Lately, I have been getting tired of making fish hook style earrings so this tutorial involves stud posts instead.

Materials Needed:

  • 4 mm pad posts
  • 18 gauge wire (I used silver plated copper for all the wire) 
  • 16 gauge wire
  • 24 gauge wire
  • round nose pliers
  • wire cutter
  • flat nose pliers
  • super glue/super glue gel/E6000 (whichever you prefer)
  • clear nail polish
  • alcohol ink color of your choice
  • scratch piece of paper and small snippet of 24 gauge wire
This tutorial might get a little long, since I just realized how many steps there are. They are all relatively simple steps, though, so it's definitely worth it to try this pair of earrings out! 

To begin, take your 16 gauge wire and round nose pliers. I began winding my spiral with the round nose pliers. Crimp the end down with your flat nose pliers so there isn't a hole in the middle of the spiral. Then wind the spiral a couple of times with the flat nose pliers. 


Cut the spiral from the wire with enough wire on the end to wrap a loop. Using your round nose pliers, grip the end of the excess wire and twist into a loop like the first picture below. Repeat this for your second spiral.

Using the glue of your choice, glue the posts to the middle of your spirals. Leave this to dry according to the recommended dry time on your glue. My super glue gel sets in a couple of minutes.


For the next pieces of your earrings, you will use 18 gauge wire. I cut two pieces, around 3.5 inches each. Begin by forming a loop at the end of your wire with your round nose pliers. Then with your flat nose pliers, grip the wire like the third photo, and angle the wire as pictured. 


Continue using your flat nose pliers to angle the wire into a rectangle. You'll have to do some guessing when it comes to measurements. I made a couple of scrap shapes until I got this one how I wanted it. 

Once you have formed your last angle, you will wrap the excess wire near the base of your initial loop. Sorry about the blurry pictures for photos two and three. Basically, you bend the wire behind the loop, and wrap it two or three times. I use the flat nose pliers to pull my wrapping tight. 


Once your wrapping is secure, cut off the excess wire with your wire cutter. To make sure there are no sharp edges sticking out, I crimp the end of the wire with my flat nose pliers. 

For the third part of the earrings, grab your 24 gauge wire. cut two pieces, about three inches long. Using your round nose pliers, you will form the loops that go on the inside of your rectangle. Play with the wire a bit if you have never worked with it before. 

The basic idea is to wrap the wire around your round nose pliers until a loop forms, then move onto the next loop. I use the ends of my pliers so the loops aren't too big. Start about an inch into the wire so that you will have excess wire on both sides of your design to use for the next step. 


I formed five loops and fit it into my rectangle to see how it would look. As you can see, I have enough wire on each end to wrap the design around the rectangle. Using your flat nose pliers, wrap the wire, pull it tight, and then cut off the excess wire. 

Next, you will fill in the loops with nail polish and alcohol ink. I used a third hand tool to hold the earrings while I worked with the nail polish. You don't need this tool. It's just more convenient. If you use your hands instead, just make sure that you hang the earrings on something as they dry. 

Using your scrap piece of paper, mix approximately five drops of polish with one drop of ink. Mix this together with a scrap piece of wire. I didn't include the pictures of how to put the polish in the wire, so if you want more visual directions check out this link

Basically, you dip the wire in the colored polish so that a drop accumulates on the end. Then, place the wire inside one of the loops. The polish should stick to the sides of the wire. You can use a light circular motion to touch the insides to the loop to help deposit the polish. If the polish doesn't hold tight, and form a complete surface, try adding more polish. If that doesn't work, the loop might be too big. 


Let the polish dry completely, then move on to the assembly stage! You will need two jump rings. You can either make them yourself with 18 gauge wire or use ready-made rings. Follow the pictures below to make your own jump rings. All you need is wire, your round nose pliers, and a wire cutter. 


Using your flat nose pliers, open your jump rings and connect the loop of the stud to the loop of the rectangle. Close your jump rings, and enjoy a nice new pair of earrings. 


If you have questions or comments, please let me know! And thanks for stopping by!