

I love screen printed tees. I love the dorky sayings, and the simplicity of these shirts. BUT I don't like paying a bunch for them. I saw tutorials of DIY shirt stencils where you use freezer paper and an iron, but let's get serious: I don't own an iron. If my clothes don't de-wrinkle in the dryer, then that's that. I'm not going out of my way to smooth out the folds. I mean really.
Obviously, I didn't want to go out and buy an iron for this project alone, so I put off making my own shirt until I happened upon a roll of self adhesive shelf liner. I was using it to pretty up the bottom of a bathroom vanity, but I had so much extra that I needed to find other uses. This material works very well for stencils. The brand I bought was called 'Magic Cover' but this would work just as well.

Materials needed:
- Shelf Liner (make sure it's the adhesive kind!)
- ruler
- x-acto knife
- shirt
- makeup sponge(s)
- acrylic paint or fabric paint in whatever color you want
- piece of cardboard to put behind where you are stenciling (prevents bleeding)
- masking tape
- hard surface that can be cut on top of
- Printer (optional)
Skills Needed
- Be able to handle a knife blade without causing injury
First of all, what do you want on your shirt? I used Word to arrange my design. Since I

Since I just wanted one line of text, I only needed to cut one piece of the shelf liner. I decided to cut a 3x11inch piece of liner, and I changed the paper size on the word document to this size as well. The actual design is about 9 inches wide and 2 inches tall. Take into account the size of where your stencil will go.

Depending on how your printer works, you may need to adjust what side of the liner you put into the printer. I put adhesive side pointing up, so my design is printed on the opposite side. If you are unsure of your printer, send a test page through.

The lines don't need to be very large. Just visible enough to act as a guide for your cuts. Also, don't touch the ink when it comes out of the printer. It smudges a bit. Just make sure you don't smudge the design off the liner.


Once your stencil is cut, position it over the shirt you are stenciling to make sure it fits your area. Prep your shirt by putting something like cardboard on the inside. I had a piece of foam board handy and used that.

Once your shirt is ready, carefully peel the back off the adhesive liner. If you move too quickly, parts of the stencil will rip if the design is more complicated.
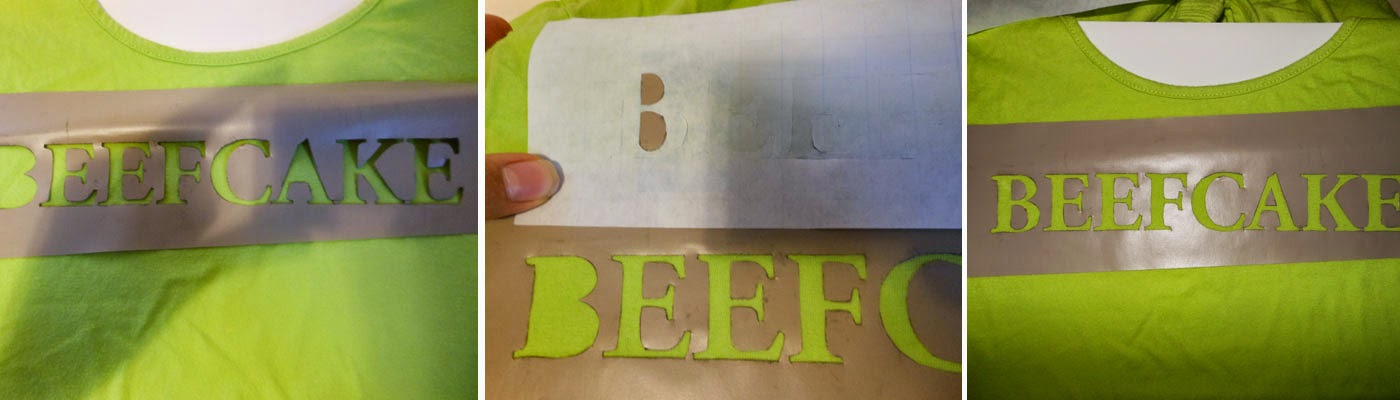
Position your design on the shirt and smooth it down. if you have letters with inner pieces, make sure to peel those off and stick them to your shirt as well. Now you are ready for the paint. I used a cheap tube of black acrylic paint. I know from experience that when I get this paint on my clothes, once it dries it doesn't come off. So I trust the paint I used to make it through the wash. If you want to invest in some actual fabric paint or screen printing paint, then go for it. Let me know what works better for you!

I used half a makeup sponge to dab the paint onto the stencil. Don't put too much paint on. You can see that I only put a small amount of paint on my makeshift palatte (more foam board). You don't want it to get thick, because it may lead the paint to crack and flake off. Keep it thin and apply just enough to get a solid color. Once you are done applying your paint, let it dry completely before you peel the stencil off.

When you peel off your stencil, peel carefully because you can use it again. You may need to make new inner pieces if they don't stick as well, but I was able to get another use out of this stencil. I could possible use it a couple more times...but I really don't need anymore 'beefcake' shirts. Honestly, one is probably pushing it.

Let me know if you have any questions or comments. I would love to see what you make using the shelf liner!
No comments:
Post a Comment