For those of you that don't know me, I am a freak when it comes to harmful chemicals. When it comes to making jewelry, there can be some hazardous materials involved. Usually, if something says that if causes cancer in California, or needs to be used in a well ventilated area, I automatically think I am dying when I use the product.
Once, in a college art class, we were using wallpaper paste to make paper sculptures and after I had been immersing my hands in this stuff for a few hours I happened to look at the label and immediately started to freak out. "Why are we using something that causes cancer without gloves or masks or haz-mat suits!? Do my hands look funny to you? I feel dizzy." Yeah, I'm that girl and then some.
Anyway, I wanted to add some colored areas to my jewelry, but I didn't feel comfortable using epoxy resins, so I improvised with nail polish (which probably isn't much better, but at least doesn't come with as many warnings). I started using liquid polymer clay and alcohol inks to add colored areas, but I am incredibly impatient, and the method I am about to show you eliminates the baking step involved with liquid polymer clay.
Materials needed:
- wire (20 or 22 gauge)
- round nose pliers
- wire cutter
- nail polish
- ear hooks (I use titanium since I am allergic to nickle)
Wire Basics:
The smaller the gauge number, the thicker the wire is. Wire in the higher 20s is used more for wrapping projects so it won't work well for stability. You may get away with 24 gauge wire for the earrings, but you would want to be a bit more careful with the final product (don't sit on them--or anything weird like that).
Before you can fiddle with the nail polish, you will need to make a pair of earrings with small loops. Cut two equal pieces of wire and follow the photos below. You will use your round nose tool to shape the earrings. You don't want your loops to be too big, otherwise the nail polish won't hold across the entire loop. To get the right size, I use the skinny ends of the pliers to form my loops.
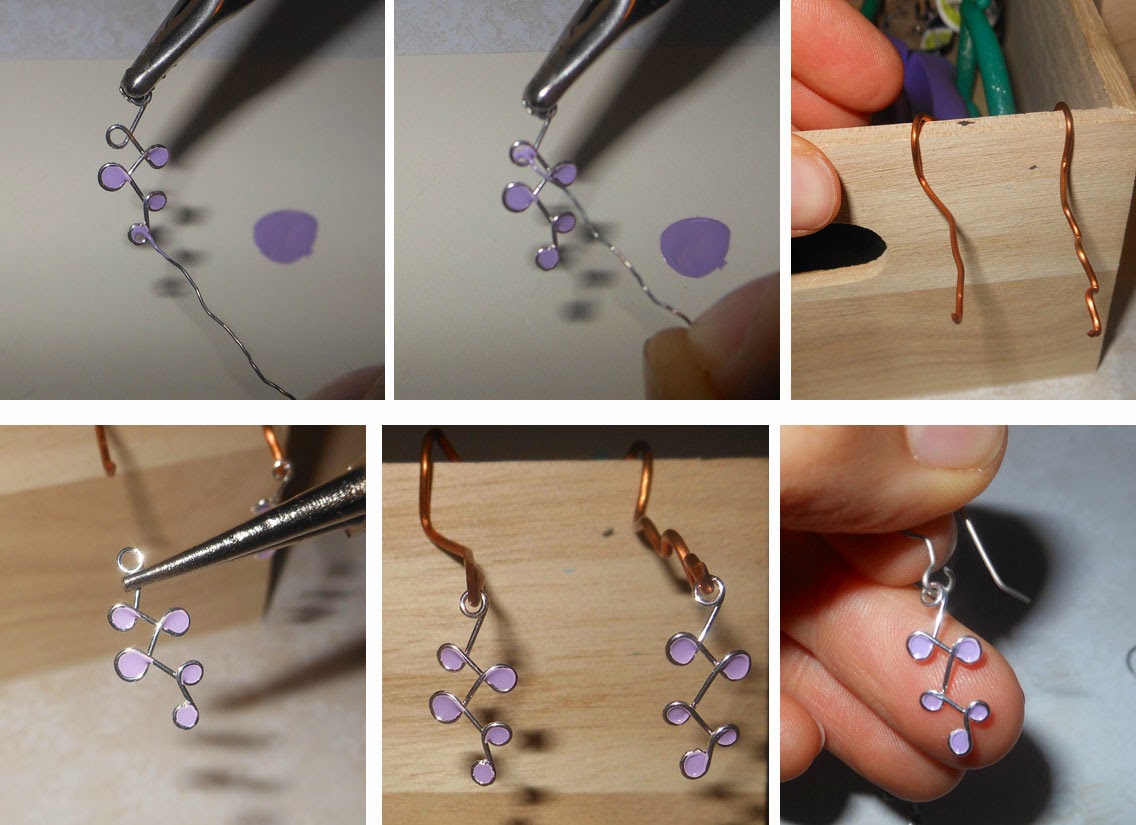
After you have your pair of earrings formed, you can move on to the nail polish steps. I use an extra piece of wire to 'stick' the nail polish into the loops. Place a few drops of nail polish onto a piece of paper, dip the extra wire into the polish. I used a third arm clip to hold the earrings as I put the polish into the loops, but that was only so I could also take photos. You can easily hold the earring in one hand, and use your dominant hand to handle the nail polish dipped wire.
I use a light circular motion with the wire while inside the loop to deposit the polish onto the earrings, then gently pull the wire out. If the nail polish doesn't hold tight, then your loop may be too big or you didn't add enough polish. Try dipping the wire again and adding more polish to the loop if that happens.
I use an old scrap piece of copper to hang the earrings on to dry. Let the nail polish set for about 10 minutes and then you can add your ear hooks.
Little Tip:
- If you are just starting to work with wire, go to a hardware store and get some cheap copper and a tool kit. The hardware store most likely won't have the round nose pliers, but you can get the wire and some other small pliers for a lot cheaper than you would at a craft store. I like to sample inexpensive materials when I get into a new medium so I don't feel bad 'wasting' materials when I have no idea what I am doing. Just don't get galvanized wire.
As always, leave questions or comments below! I would love to hear what you have to say. And stay tuned for another nail polish earring tutorial, this time involving alcohol ink. (Update: click here for the new tutorial)


No comments:
Post a Comment